Openfiler Installation and configuration:
Download openfiler-2.3-x86_64-disc1.iso from http://www.openfiler.com/ website.
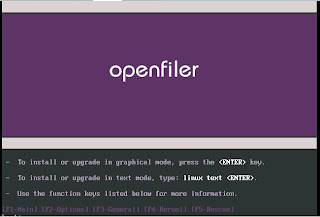
You can skip the media test and start the installation be selecting SKIP and press enter.
In the above screen its shown that you can access the openfiler web interface through
https://192.168.2.55:446
Default User : openfiler
Password: password.
Change the password according to your environment after initial log in.
First you need to set a Network access Point. This machine / network will be used as client.
If you are setting a iscsi device for a host, u need to give 255.255.255.255 as netmask.
If you are setting a iscsi device for a network, u can give 255.255.255.0 as netmask.
Take the web interface and click the system tab:
Client system : oral01
Ip Address : 192.168.2.51
Creating Volumes:
Openfiler uses LVM concept like Linux.
we need to create physical volume and then logical volume.
Step1) Click on volumes tab and select block devices on the right hand side of the volume section.Please see screen below screen shot.
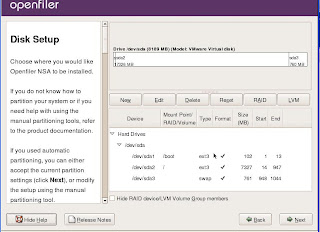
In Linux before Assigning Disk to volume group you need to create at least one partition.In openfiler also we need to follow the same approach.
Click on the block device which you need to use and then select create button.
Now Assign this physical volume to a volume group.Create a file system.
Select Add Volume on right side and you will see below screen.
Volume Name (*no spaces*. Valid characters [a-z,A-Z,0-9]): = oradisk1
Volume Description:Test volume to setup shared disk for oracle rac installation
Required Space (MB): 992
Filesystem / Volume type:iSCSI
Now make sure iSCSI Target server is running by clicking on services tab.In this case it is disables,so please click on enable.
Now again click on Volumes tab and click on iSCSI Targets on the right side in the volumes section.
Click on Lun Mapping tab and assign previously created volume to this target.
Click on Network ACL and assign this lun to previously configured network.
Client [iscsi initiator] Configuration:
Here we are using a redhat enterprise linux5 as client. In order to use openfiler target as disk, it has to be set as iscsi initiator. For that we need check iscsi-inittiator is installed.
Login to the client system as root.
[root@oral01 ~]# rpm -qa | grep -i iscsi
iscsi-initiator-utils-6.2.0.871-0.10.el5
[root@oral01 ~]# service iscsid start
Turning off network shutdown. Starting iSCSI daemon: [ OK ]
[ OK ]
[root@oral01 ~]# chkconfig iscsid on
[root@oral01 ~]# chkconfig iscsi on
[root@oral01 ~]# chkconfig --list | grep iscsi
iscsi 0:off 1:off 2:on 3:on 4:on 5:on 6:off
iscsid 0:off 1:off 2:on 3:on 4:on 5:on 6:off
Searching the iscsi target:
[root@oral01 ~]# iscsiadm -m discovery -t sendtargets -p 192.168.2.55
192.168.2.55:3260,1 iqn.2006-01.com.openfiler:test
You will get the scanned result as the line above.
Manually Login to iSCSI Target(s)
iscsiadm -m node -Tiqn.2006-01.com.openfiler:test -p 192.168.2.55 --login
[root@oral01 ~]# iscsiadm -m node -Tiqn.2006-01.com.openfiler:test -p 192.168.2.55 --login
Logging in to [iface: default, target: iqn.2006-01.com.openfiler:test, portal: 192.168.2.55,3260]
Login to [iface: default, target: iqn.2006-01.com.openfiler:test, portal: 192.168.2.55,3260]: successful
Configure Automatic Login
iscsiadm -m node -T iqn.2006-01.com.openfiler:test -p 192.168.2.55 --op update -n node.startup -v automatic
[root@oral01 ~]# fdisk -l
Disk /dev/sdd: 1040 MB, 1040187392 bytes
32 heads, 62 sectors/track, 1024 cylinders
Units = cylinders of 1984 * 512 = 1015808 bytes
Disk /dev/sdd doesn't contain a valid partition table
Now we'll partition the iscsi device:
[root@oral01 ~]# fdisk /dev/sdd
Device contains neither a valid DOS partition table, nor Sun, SGI or OSF disklabel
Building a new DOS disklabel. Changes will remain in memory only,
until you decide to write them. After that, of course, the previous
content won't be recoverable.
Warning: invalid flag 0x0000 of partition table 4 will be corrected by w(rite)
Command (m for help): n
Command action
e extended
p primary partition (1-4)
p
Partition number (1-4): 1
First cylinder (1-1024, default 1): Using default value 1
Last cylinder or +size or +sizeM or +sizeK (1-1024, default 1024):
Using default value 1024
Command (m for help): w
The partition table has been altered!
Calling ioctl() to re-read partition table.
Syncing disks
Create ext3 file system on this device and mount it as /crs.
[root@oral01 ~]# mkfs.ext3 -m 0 /dev/sdd1
mke2fs 1.39 (29-May-2006)
Filesystem label=
OS type: Linux
Block size=4096 (log=2)
Fragment size=4096 (log=2)
126976 inodes, 253944 blocks
0 blocks (0.00%) reserved for the super user
First data block=0
Maximum filesystem blocks=260046848
8 block groups
32768 blocks per group, 32768 fragments per group
15872 inodes per group
Superblock backups stored on blocks:
32768, 98304, 163840, 229376
Writing inode tables: done
Creating journal (4096 blocks): done
Writing superblocks and filesystem accounting information: done
This filesystem will be automatically checked every 29 mounts or
180 days, whichever comes first. Use tune2fs -c or -i to override.
[root@oral01 ~]# mkdir /crs
[root@oral01 ~]# mount /dev/sdd1 /crs
[root@oral01 ~]# mount /dev/sdd1 /crs
/dev/sdd1 977M 18M 960M 2% /crs
You can check the status of client connects in the openfiler web interface.
Now you have your own SAN server is up and running.


No comments:
Post a Comment